Weekend DIY: Stump Stools

Before & After, Furniture, Outdoor Decor, Outdoor Party, Pin Inspiration, Weekend DIY

Everyone dreams of having that amazingly decorated,-cozy outdoor room often seen in  magazines or design blogs. But you easily brush if off because how in the world would you make it look like that yourself? Well, we recently came across a photo of a lovely outdoor dining set up, immediately thought “oh so pretty” and next, how awesome are those stools?! Then, we thought where do you find those! Finally we thought, let’s look at pinterest for a DIY. Here’s the image we’re referring to:

stone wall outdoor dining table with tree stump stools (Source: Pinterest)

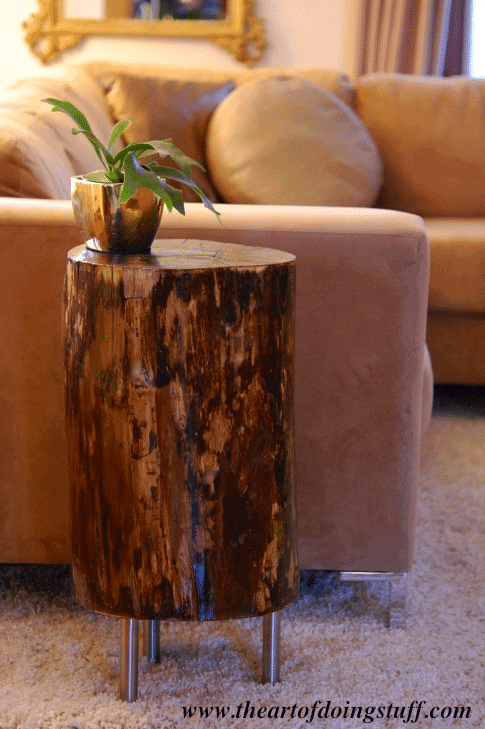
So, stumped on what to do this weekend? (no pun intended, haha) Not anymore! We’ve got the perfect DIY project for you to start and it would make a great addition to your outdoor living room,a porch or even your favorite rustic indoor space! This DIY comes from the blog, The Art of Doing Stuff. The author believes in not spending lots of money on the things that fill your home, as she’d rather find it at a garage sale or on the side of the road as opposed to a fancy store. So when she also saw a tree stump side table in a magazine, she thought, “I can make this”. And so can you.

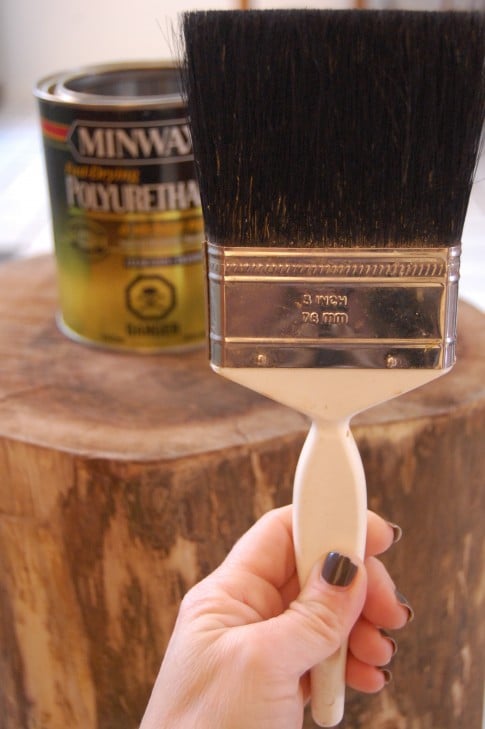
This DIY stump project is something you’ll want to start this weekend, and finish up in about a month – as you have to allow the stump to dry out. But don’t worry; it’ll be ready just in time for the arrival of spring! The bonus is this project doesn’t cost much, especially if you can easily track down an old tree stump outdoors. Next, you’ll need some polyurethane, sand paper and a paint brush. If you want to make it into a side table, you could even add legs like she did. She shares the whole DIY instructions on her blog, so head on over and check out how to make this amazing stool or side table.

(Source: The Art of Doing Stuff)

We also found another great example of how to use a stump sidetable on the blog Design Megillah. Check it out to see how she made her stump!

Happy Weekend!
team-signature

A Winter Wonderland

Beautiful Outdoors

Snow. Snow. It’s everywhere you look, especially if you are in the north! Last week we got a nice helping of snow to beautify our rather dead looking scenery. While it made for not the most fun drive home or shoveling experience, it did make things look oh so wonderful.

After all the snow was cleaned up, one of our team members took a few shots of the  snow sticking to the trees and bushes at her home. Since we are outdoor lovers at Willard & May, we figured we’d share them with you. Maybe you’re tired of the snow like us, or you’re dying to get your hands on some – either way, sit back and enjoy the beauty.

Do you have awesome photos of the scenery in your backyard? If so, share them on our facebook page and we’ll add it to this post!
team-signature

Weekend DIY: Updating Dated Lights

Before & After, Curb Appeal, Weekend DIY

Like your front door, the entry way lights which guide your guests to your home set the tone for what’s inside your house. Don’t believe us? Go take a quick look!

Are they constructed of out-dated, hideous brass which means your house is stuck in the 90’s? Are they sponge-painted, giving the impression that your house is holding out for a return of the 80’s? Are they northwoods-y, but yet everything else in your home screams modern? Or perhaps they are simply just 100% not your style. This weekend, let’s fix that and enhance your curb appeal!

This weekend DIY project is inspired from Katie of the blog BowerPower. A few years ago, they traded in their outgrown home for their dream home – completely dreamy, besides the fact that most of the design aesthetic was stuck in the 80’s — for instance check out their sponge painted light fixtures. For a quick update she decided to spray paint them rather than replace them. The only cost involved was painters tape, spray paint and pieces of leftover cardboard. Head on over to her blog to read the step-by-step DIY instructions for easily updating your own outdoor light fixtures, plus her amazing before and after pictures.


(Photo Source: BowerPower Blog)


(Photo Source: BowerPower Blog)

(Photo Source: BowerPower Blog)

Have you ever transformed something in your outdoor space with just a little spray paint? What style are your front porch lights? Are you able to transform them with some spray paint, or were they just too big of a crime so you ended up replacing them? Tell us in the comments below!

Happy Weekend!
team-signature

Weekend DIY: Potting Bench

Weekend DIY

Look outside your window right now: do you see snow or green grass? Our office windows face the front of our building, and we’re unfortunately seeing snow right now. Green grass is not in the forecast for at least a month or two for us! If the same is true in your case, don’t let it get you down! To help wash away the winter blues and get you in the springtime mood, here is a simple one-day DIY project that can be completed in your garage: creating a potting bench.

diy potting bench centsational girl

Kate from Centsational Girl had plans to build a potting bench for years, but it wasn’t until this past summer that she and her husband actually got out the hammer and nails to do so. She followed a building plan from Better Homes & Gardens to complete this DIY project but made some modifications along the way, like adding colorful, vintage hose faucets (super cute by the way)! Head on over to her blog to read all about the DIY process and how it’s making her want to get her hands dirty!

redwood potting bench side view centsational girl

one who plants a garden

Happy Weekend!
team-signature

Weekend DIY: Chalkboard Paint Herb Pots

Gardening, Outdoor Decor, Pin Inspiration, Weekend DIY

It’s never too cold to grow herbs indoors! Even temperatures that reach -8 degrees F like we experienced in WI this week can’t stop you!  Growing herbs indoors during the winter is not only convenient for adding a special touch to your kitchen creations but also is a great way to help keep your spirits high during the winter months – who doesn’t enjoy some fresh basil or oregano?

You know what else will keep your spirits high? Doing a fun and easy weekend DIY project! How about some chalkboard painted pots to grow these tasty herbs in? Wouldn’t these look great along a kitchen windowsill? The Weekend Homemaker has a great little DIY project on her blog that shows you step by step how to create this project. The only thing that you might need to do differently is start these herbs from seed since most nurseries won’t have these in plant form quite yet this season. Head on over to her blog for the full DIY instructions! (P.S. Chalkboard paint can be purchased at just about any big box home improvement store (Home Depot, Lowes, Menards). Just look in the aisle by the spray paint!)

wmblog-chalkboardPots

Does anyone else have a fun weekend project ahead of them?

Happy Weekend!
team-signature

6 Tips to Help you Get Organized

Pin Inspiration

Everyone makes a goal at the beginning of the year to be more organized. No matter what it is you’re trying to make sense of – maybe your house, garage, life – here are six tips to help you stick to your new year’s goal!

wm_mom_main1

1. Get Inspired
Whatever you’re hoping to get more organized – whether it be your garage, office, your kitchen – find inspiration to encourage you along the way. A great place to start would be Pinterest. Find images of that neatly laid out garage shed and aim for that.

2. Set a Timer & Deadline
If you have a hard time getting started, set a timer for just 15 minutes and don’t stop organizing until time’s up. You can always continue past the timer if you are into it! Also, set a deadline to encourage yourself. Remember it takes 21 days to form a new habit.

3. Stay Put
One of the worst things you can do while trying to reorganize a room, shelf, closet, or space is leave that room, shelf, closet or space to put something else away. While organizing, keep a large box or other storage device near you to collect all of the items that don’t belong where you’re working. Then once you have finished the project, start placing those items where they belong. Leaving your project to put something away will only encourage distraction and take away from the success of the task-at-hand.

4. Enlist your Family’s Help
Get your family on board with your goals for 2013. Chances are, if they aren’t working with you to stay organized, they are most likely are working against you. Teaching your kids to put things away once they are done using something will help you AND them become more organized. They’ll also appreciate being included in your plan.

5. Make it Fun
Crank up the music, dance while your organizing, bottom-line HAVE FUN!

6. Reward Yourself
By now, you have probably realized if you don’t do it, no one else will. That garage is not going to organize itself! So after putting in your hard work and reaching your goal, reward yourself. Maybe take yourself out for ice cream or buy those shoes you’ve been eyeing up for months!

team-signature

Scratching the Garden Itch

Gardening, Pin Inspiration, Store

If you’ve come to this blog, chances are you are lover of the outdoors…after all, this is intended to be an inspirational outdoor living blog! We hope this blog is satisfying your desire to be outdoors, despite the frigid temperatures or mountains of snow you are facing in your backyard. We hear you loud and clear, and we’re with you!

If you were hoping to find some ideas to “scratch that garden itch” you’ve been facing since October, or maybe the first frost, it’s your lucky day. There are numerous ways you can garden in the winter or at least prepare for your glorious spring and summer gardens.

Plan your garden
Winter is a great time to re-envision your garden. Start by heading over to Pinterest and gather inspiration for your spring and summer gardens. Make a Pinterest board with your favorite garden images that could work in your yard. Then head on over to a flower bulb or garden website and start pinning your favorite flowers and plants you’d like to add to your garden. There in one space (a pinterest board) you can see how your vision is unfolding and you’ve now also bookmarked your favorites for when you’d like to purchase them! This can also help you to decide what you like most and prioritize if you’re working under a space or money constraint.

pinterest-planning

Start seedlings
Many stores and websites start selling seeds in January, so now is the time to go pick up your favorites and start them indoors. There are numerous different and easy ways you can start them, for example in old toilet paper rolls, egg trays, cloches and more. Then after the last frost, you can transplant your mature plants outdoors!

starting-seeds-early(Photo Source: Mommysavers)

Force bulbs indoors
Fall-planted bulbs (tulips, daffodils, hyacinth, etc.) can be forced to bloom earlier indoors — all you have to do is trick them! If you have fall bulbs you haven’t planted, all you need to do is chill them or finish the process of chilling them. Once they have been chilled for the proper amount of weeks, move them to a warm location in your home and enjoy their beauty. For tips on forcing flower bulbs, read this guest blog post, Flower Bulb Forcing. If you’d like to purchase already chilled bulbs, visit Willard & May.

Create a Terrarium/Succulent Garden
We love succulent gardens because they are easy to grow, pretty hard to kill (bonus!) and have a whimsical feel – almost like you could find a little fairy floating around them. One of our designers thought she’d give a succulent garden a try last February, and we all agreed it was nice to showcase a little extra green in our homes or office. To read more on how to create your own Terrarium, visit this blog post titled, Weekend DIY: Indoor Gardensucculent miniature garden in bowl

What have you been doing to “scratch your garden itch”? We’d love to hear all about it!
team-signature

New Years Resolutions: Outdoor Style!

Pin Inspiration, Store

As you know the New Year is here! (As if you didn’t know, right?) As always, the new year is a time to reflect on the past year as well as make new goals. You may think back and realize you didn’t accomplish all you wanted to in your backyards or maybe you wish you would have had more opportunities to visit your favorite national park. Whatever it may be, this year why not trying to set a goal (and a deadline if that helps) and actually stick to it?!

In the spirit of new year’s resolutions, our team put together a few resolutions for 2013, relating to the outdoors. See what they have to say….

outdoor-resolutions


Jenny – I want to plant a vegetable garden in my small city lot using only heirloom vegetables and non-GMO seeds. To maximize the amount of space I can grow veggies in, I intend to plant in containers, as well as use the vertical growing area provided by my fence for climbing veggies like beans and cucumbers.

Mel – I really would like to add some personality to the back entrance of our house, which typically gets used more than the front. I’m hoping to incorporate some “no-installation-needed” LED lighting items and maybe add a few whimsical accents here and there to get me started!

NickThis year, I’m facing my fear of heights and going skydiving — I figure I might as well go all out. I’d also like to camp more throughout the summer – maybe I’ll even take a Chimenea.

VanessaOur deck could use some freshening up – I hope to pressure wash it to renew the wood, as well as add containers of colorful blooms that I can enjoy throughout the year. I’d also like to start my day more often out on my patio, drinking coffee.

Jonathan – My resolution is to get to the park/beach more, play some basketball, maybe some sand volleyball, and definitely enjoy the radiant sun. Pass the sunscreen, please.


Hopefully, we’ve inspired you to make a list of goals for 2013…or, if not a list, make at least one resolution! And if you feel like sharing your own, please do in the comments below!

Happy New Year!
team-signature

Holiday Wreath Ideas

Outdoor Decor, Pin Inspiration

It’s not too late to deck the halls AND your front door with boughs of holly and whatever other creative ideas are out there! Over the past few weeks, Pinterest has been flooded with unique wreath ideas for the holiday season. Many even involve non-traditional materials, such as cotton balls, gift bows, picture frames and more. This isn’t your grandma’s Christmas wreath anymore!

We’ve compiled our favorites and want to share with you in case you need some last minute inspiration before your holiday guests arrive!


(Source: It’s Overflowing)

(Source: House by Hoff)

(Source: Design Improvised)


(Source: Fit2feelbetter)

Winter wreath--brown and blue ornament wreath
(Source: Canadian Living)

PS – many times wreaths also look great hung above the fireplace, so if your door is all decked out already, think indoors!

team-signature

Weekend DIY: A Christmas Tree for the Birds

Birds, Outdoor Decor, Weekend DIY

While most of our northern bird friends fly south for the winter (as would I if given half the chance), some of our bird friends stay put and wait out the long, cold winter with us. Chickadees, Cardinals, owls and many others are the brave souls you’ll see fluttering around your yard this winter. Finding food in the winter is a much larger task than in the summer months, as snow covers the ground and not as many people venture out to re-fill their bird feeder.

Once Christmas is past and your tree is starting to look dried out, here is a suggestion: decorate the same tree, but outdoors for the birds! Robin from the blog The Robin’s Nest shared a great example of just how to decorate a Christmas tree for the birds. We’ll share a few photos and ideas from her blog, but then head on over to her site to view more!

(Photo: Robin Beck)

A few examples of decor she created for the tree were peanut and berry garland, bird seed ornaments and purchased bird houses. A few tips she shares:

  • Use wire for the garland instead of string. The birds will bite through the string and take it with them otherwise.
  • You can buy square-shaped bird seed chunks and then turn them into a present with raffia. Otherwise you can find bell-shaded ones at this time of year, or make your own from these diy instructions.
  • Add bare sticks throughout the tree for birds to perch on.
  • Tie everything to the tree with wire and zip ties. Squirrels also will love the tree and will tend to run up and down – easily knocking things off the tree if items are not secured.

(Photos: Robin Beck)

Happy Weekend!
team-signature